NDES and SCEP for Intune: Part 2
Before we move on to Part 2, there are two tasks I should have included in Part 1.
First, we need to give the NDES service account permissions to request and issue certificates. Log into the CA and launch the Certification Authority console. Right click on the CA and click Properties.

On the “Security” tab, add the NDES account and check the boxes for Issue and Manage Certificates and Request Certificates permissions.

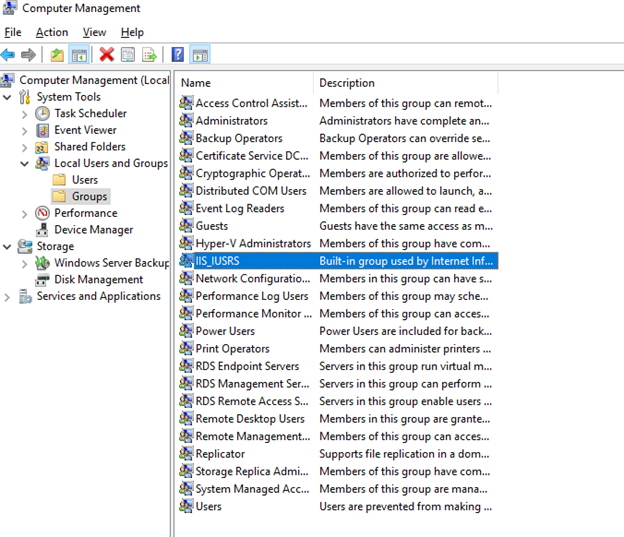
Head back to the NDES server. Launch “Computer Management” and add the NDES account to the IIS_IUSRS group.
All good? Terrific. On to Part 2…
Part 2: IIS Filters, Azure App Proxy, and the Certificate with the external DNS
Configure Request Filtering (NDES)
Log into the NDES server and launch the IIS Manager. Navigate to the “Default Web Site” and select Request Filtering.

Click Edit Feature Settings…

Change the value for Maximum URL length (Bytes) and Maximum query string (Bytes) to 65534.

The requests for certs coming through the Intune connector can get quite lengthy, and we don’t want them getting stuck at the door with the bouncer.
To further solidify those values, open the Registry Editor on the NDES and navigate to COMPUTER\HKEY_LOCAL_MACHINE\SYSTEM\CurrentControlSet\Services\HTTP\Parameters and add the following DWORD values:
Name: MaxFieldLength
Base: Decimal
Value data: 65534
Name: MaxRequestBytes
Base: Decimal
Value data: 65534

Download the Azure App Proxy connector (Azure AD)
Login to Azure AD with global administrator rights at https://aad.portal.azure.com and navigate to Azure Active Directory -> Application Proxy -> Download connector service.
Accept the terms and download.

Install the Azure App Proxy connector (NDES)
On the NDES server, launch the AADApplicationProxyConnectorInstaller.msi. Agree to the terms and click “Install”.

When prompted, login with Azure AD global administrator rights.

Assuming you know the password, you should be all set.

Go ahead and close the installer.
Add the on-premise application (Azure AD)
Log back into https://aad.portal.azure.com and make your way back to the app proxy. You should now see the healthy connection as active and pointing to your NDES server.

Select + Configure an app.
Give the application a friendly name (I chose “SCEP) and then specify the <http://FQDN> of your NDES.

Azure will automatically concatenate the external URL. Copy that into a notepad or sticky cause we’re going to need it a few times later.
Set “Pre-Authentication” to Passthrough. Leave the other values as defaults. Click +Add when you’re done to save the application.
*Troubleshooting tip
Be sure the internal URL name does not have any wrong characters or spelling errors, as that will ruin the whole thing. Like the brilliant mind that I am, I initially entered my internal URL as http://z0tndes.zerotouch.local and in reality, it is http://z0t-ndes.zerotouch.local.
That lack of a hyphen sank the whole ship later until I went back and corrected it.
Request the NDES certificate (NDES)
We’re going to use the same client/server authentication template we made originally, based off the web server template, to authenticate both the NDES to the CA and for the Intune SCEP connector in Part 3.
On your NDES server, launch MMC and add the local computer certificate snap in. Right click on “Personal” and select All tasks -> Request New Certificate.

Select “Active Directory Enrollment Policy” and click Next.

Find the NDES template you made and click the “More information is required…” link

For the “Subject name”, select Common name from the drop down. Add the FQDN of your NDES server as the value and click Add>
For “Alternative name”, select DNS from the drop down. Again, add the FQDN as the value, and then add the external URL of the app proxy from the previous step as the second value. It should look like this:

Select OK, and then check the box next to the template and hit Enroll.

The NDES server will now have the client/server authentication certificate in the “Personal” certificate store.
Alright, I think we’ve all earned a little rest before Part 3. See you soon.